High-quality audio is an important factor for professional videos.
It is literally half of the viewing experience.
The most important piece of equipment for improving your audio is, you guessed it, a microphone. 🎤
Modern iPhone and Android devices come with pretty good microphones, but they are designed for everyday sound rather than specifically voice.
They also tend to pick up all kinds of sounds, including annoying background noise such as traffic, whirring computer hard drives, and echo in a room. This can make the audio noisy and distract the viewer.
For this reason, audio is an area worth investing in.
There are many different types of microphones on the market, but my go-to for this kind of thing is the RØDE range of microphones as they are designed specifically for smartphones:
1. RØDE SmartLav+ Lavalier (wired)
This wired model can be discreetly positioned on your clothing, near your mouth, to clearly pick up every word you say. Wires can be hidden in your clothing.
The SmartLav+ has a much fuller and clearer sound than the inbuilt microphones. This makes the sound easier to listen to for long periods of time.
It’s also much more affordable than other alternatives.

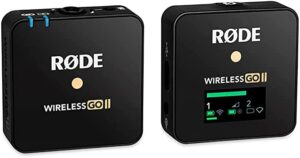
2. RØDE Wireless Go II
Fed up with those pesky wires? If you have the cash and would like to get rid of wires, a great solution is the Rode Wireless Go II.
The microphone is connected to a wearable transmitter that sends the sound wirelessly to a receiver plugged into your smartphone. You’ll look and feel the part and will have the freedom to walk around without needing to unplug! The sound quality is great too.
Accessories
Adapters
iOS devices – eg iPhone / iPad
Since the iPhone 7, Apple has removed the 3.5mm headphone jack from their iPhones, meaning you’ll need an adapter to use the Rode mic setup. You may already have one included with your iPhone; if not, you can pick one up from Apple.

Android and Mac
Some Android devices still have the 3.5mm jack so you’ll need to check your device. If not, you’ll need to purchase a USB-C to 3.5mm adapter.

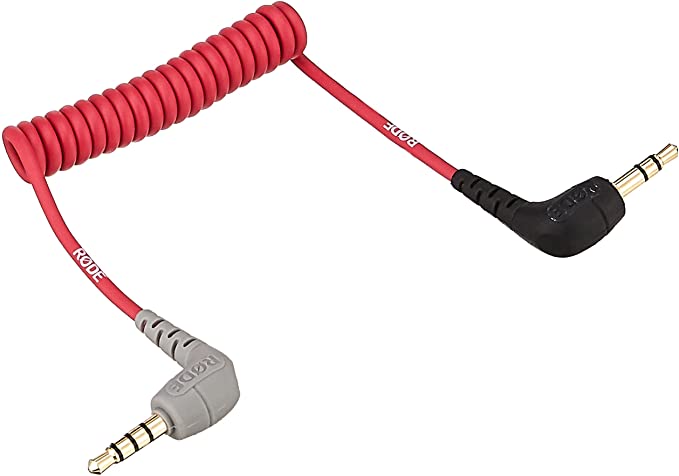
Patch cables
Not all 3.5mm jacks are the same. The difference can be seen in the number of lines that go across the connection. If there are 2 lines it is a TRS connection, if there are 3 lines it is a TRSS connection. TRS connections (2 lines) do not work with iOS or Android devices. To solve this issue, you can use a TRS to TRSS cable.
Extension leads
If you’re planning on being more than one metre away from your iPhone and opted for the wired version, you’ll also need to pick up a 3.5mm extension cable. Be careful which cable you order. You want the cables with the three black lines on the connector, this means that audio is able to pass through and work as you would expect.
Testing the connection
After you’ve successfully connected all your dongles, you should run a test to make sure the audio is being recorded from the right microphone. To do this, start recording yourself and speak into the mic, gradually moving the mic away from your mouth whilst you continue to speak at the same volume. To review the footage, disconnect your microphone from your iPhone and hit play. If it sounds like your voice is gradually getting further away, then it’s working. If the sound stays exactly the same, this means the inbuilt microphone was being used. If this happens, make sure all of your equipment is working and the cables are securely clicked into place.
Positioning
Now your technical setup is ready to go, you need to make sure the mic is well-positioned for optimal audio quality. Having it just below your collar is normally a pretty safe bet, around 6-8 inches away from your mouth.
Think about what you’re wearing though, as you don’t want the mic rubbing against fabric – this will create an awful scratchy sound that will ruin your audio.
Once you think you’ve got the mic in place, run some tests before you start shooting for real to make sure everything is working and sounding good.
Other options
If you’re on a budget and aren’t looking to invest in audio equipment just yet, there are budget-friendly options out there too.
Before heading for eBay, try the wired headphones that came with your device. They usually have a good quality microphone built in and are well suited for our purpose as they are designed for voice.
If you can find a nice place to hide the earpieces, they can work well. Airpods work well too if you have a set.
One other option is to try enabling the STEREO option using your inbuild microphones (on supported devices). This can result in a richer sound with less noise.
So that’s everything you need to know about improving your audio using external mics.
Remember, audio is half the viewing experience, so don’t overlook it!
Next… let’s add some background music to the video